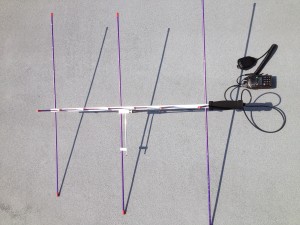
There’s an 2m / 70 cm Antenna from Arrow that is highly recommended for LEO satellite experiments. The antenna is specifically designed for hand-held satellite operation and is very lightweight. The model I use is the one with a build in duplexer. A duplexer is necessary because there are two separate BNC connectors for both 2m and 70cm on the antenna. So unless you want to use two radios, they need to be combined somehow – that’s what the duplexer is for.

A simple hand-held radio and a directional antenna for 2m / 70 cm (440) is everything that is needed to operate through amateur radio satellites
There are currently only two satellites out there that support 2m / 70 cm FM traffic. They are called AO-27 and SO-50. AO-27 is a little bit more powerful than SO-50 and is easier to receive, yet it is often overcrowded and the transponder is only active within specified times according to a schedule. SO-50 requires a 67.0 Hertz PL-tone on it’s input frequency. Please be absolutely certain to activate the PL tone when operating SO-50.
For more information on both satellites, visit their corresponding webpages. Click here for SO-50 or here for AO-27.
Both satellites use the same frequency pair. The uplink frequency is 145.850 MHz and the downlink is 436.795 MHz. The actual downlink frequency seen by your receiver will vary by +- 10 KHz due to the doppler effect. When transmitter and receiver have a relative speed towards each other, the actual receive frequency appears offset. If the transmitter is moving towards the receiver, the frequency appears higher and vice versa. The change in frequency is proportional to the speed and frequency.
It is recommended to start listening for the satellite about 10 KHz above the downlink frequency when the satellite appears at the horizon. The downlink frequency should be “spot on” when the satellite is exactly above the receiver location and decrease by about 10 KHz until the satellite disappears at the horizon.
Working satellites takes a bit of preparation before the actual operation. A software is needed to track satellites and predict their path to determine suitable passes for radio contact. I recommend the Software SatPC32.
Once a suitable pass is found, the actual operating part is fairly easy. Arm yourself with an HT, an antenna, and ideally a voice recorder and head out to a nice location with clear view of the sky. Why a voice recorder? It’s simple. Contacts on satellites are very short and fast. Recording the contacts takes a lot of workload off the operator. I use a little clip on microphone and an Olympus digital voice recorder.
Tune your the transmitter uplink frequency (and in case of SO-50 set the PL-tone) and the receiver to 10 KHz above the downlink frequency. Open the squelch completely and point the antenna in the general direction where you expect the satellite to appear on the horizon. Move the antenna around a bit. Once the satellite appears on the horizon the noise will disappear and voices will be audible. The closer the satellite gets, the stronger the signal will get. Follow the satellite with your antenna. The signal strength is a good indicator for moving your antenna. If the sound becomes “fuzzy” and “scratchy” it’s probably time to adjust the downlink frequency. Tune it down until it sounds perfect again.
I highly recommend listening to a few satellite passes before attempting to transmit. You will see that tracking the satellite, adjusting the frequency, and listening to the conversations on the transponder will be enough workload at first. Familiarize yourself enough with tis mode of operation until you feel truly comfortable.
Once you feel comfortable enough to transmit, go for it. Please do not make the rookie mistake and call CQ on a satellite. That would only take valuable air time from others. A call consists out of your call sign, your gridsquare (first 4 digits of Maidenhead Locator for your QTH) and optional the indication “handheld” or “portable”. If it is your first time, add “first time”. By indicating that it is your first time, operators will try to dedicate more time for you on the satellite. It is not uncommon to make 3 or more contacts on your first pass. A proper call could look something like this: “KX9XXX in EM34 handeld”.
That’s really all you need to know for your first tryout. Enjoy your first satellite experience.
Questions? Ask!
Westerhold, S. (2012), "Working low earth orbit satellites". Baltic Lab High Frequency Projects Blog. ISSN (Online): 2751-8140., https://baltic-lab.com/2012/08/working-low-earth-orbit-satellites/, (accessed: April 18, 2024).
Funding:
If you liked this content, please consider contributing. Any help is greatly appreciated.